
Your BMW F20 is more powerful than you think. The BMW 1 Series is one of the most popular models among BMW enthusiasts. With the Carly OBD scanner you can even code your BMW F20 and personalize its features!
With the Carly OBD2 scanner and app you can easily code as many features as you want for an affordable price. Having you own OBD2 scanner makes it possible to code your BMW in just a few minutes. Today we will go through the TOP codings that you can perform on your BMW F20 with the Carly scanner and app.
Coding always depends on which ECU version and software is installed — depending on the version this list could be more limited.
Here is a list of all the possible codings you can do on your BMW F20. The following list applies to the F20 and F21 models in the 1 Series. If you are interested in a particular coding, just click on the item and dive straight into it!
Ambient Lighting Coding
As the title suggests, this section is all about ambient lighting — which is the interior lighting of the doors and consoles that give your BMW F20 a very special style.
First of all, you have to use the function “Ambient Lighting Brightness 1/2” to select whether the ambient lighting should be automatically adjusted to the brightness of the speedometer illumination or whether you want to adjust the brightness independently from the speedometer. Moreover, if you have chosen the latter option, you will get to the next step “Ambient Lighting Brightness 2/2”. In this step you can choose between different brightness levels:
- Very low
- Low
- Rather low
- Medium
- Rather bright
- Bright
- Very bright
Both options can be easily coded in the Front Electronic Module (FEM).
Coding BMW F20 Turn Signals
An essential function of the BMW F20 is of course the turn signal. In order to move even more safely in traffic, you can make a few adjustments here as well.
Coding the blinker
First of all, you can regulate how often your blinker flashes when you activate it. You can choose between the following options:
- Blink: 1 time, 3 times, 5 times or 7 times
The coding can be done using the Front Electronic Module (FEM), but you may need to activate the setting in the iDrive first.
Flashing signals
In addition, you can activate the optical confirmation when unlocking the door and choose between different flashing signals. Before you configure the coding of the optical confirmation when unlocking, you must activate it via the Roof Function Center (FZD). Only then can you select your preferred options via the Front Electronic Module (FEM).
These are the selection options:
- Flash: 1 time, 2 times, or 3 times
You can also configure the same settings for visual confirmation when locking your BMW F20. Again, the function must first be activated via the Roof Function Center (FZD). Then you can code one of the above mentioned options via the Front Electronic Module (FEM).
A particularly interesting coding option is to add the turn signal to the Head-Up Display. This way you can more easily see your turn signal while driving, without letting the traffic out of your sight for even a second.
For BMW F20 models up until 2013, you can activate the blinker in the Head-Up Display via the COMBI module. After this function is switched on, additional functions can also be activated.
Another possibility to activate the blinker in the Head-Up Display, independent of the model year, is via the Car Information Computer (CIC). When this function is activated, a menu item is displayed in the iDrive, which can be used to show flashing signals and warning indicators in the Head-Up Display. To use this function you must first activate it in the Head-Up Display (HUD) module or in the COMBI module.
And if somebody tries to steal your beloved BMW F20 you can set the turn signals to activate along with the alarm. If the alarm is triggered, the indicators will start flashing. This can be easily coded via the Roof Function Center (FZD).
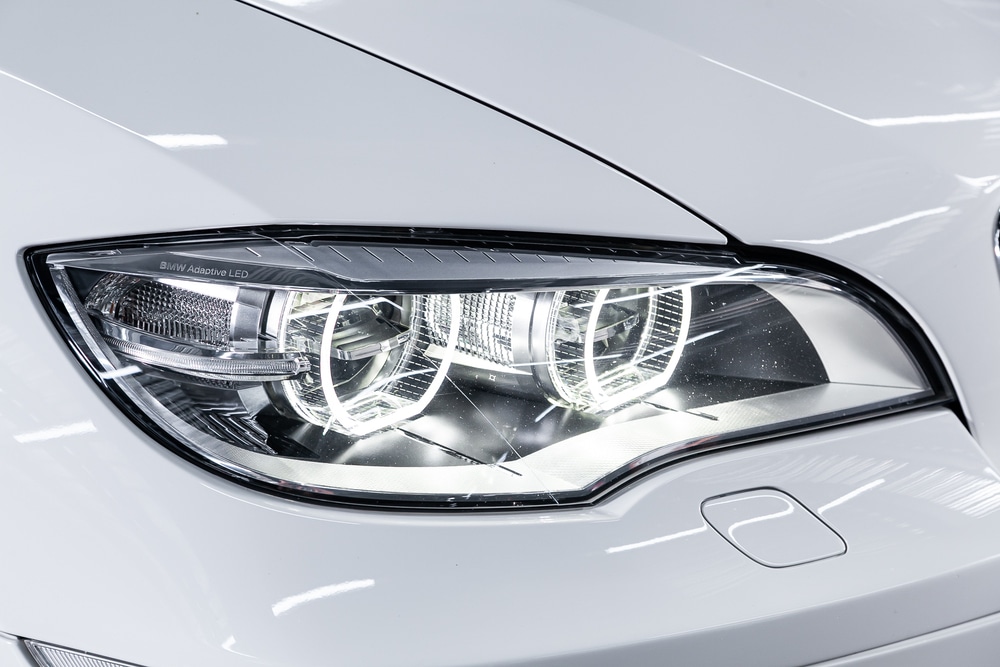
Corona Rings (Angel Eyes) Coding

Another topic that will surely interest many of you is the coding of the Corona Rings, i.e. the Angel Eyes of your BMW F20. To make them stand out you can change the brightness of the daytime running light, parking light, and parking light settings.
In general, please note that the Corona Rings are always coded independently of each other. This means that you have to make the desired setting on the right Corona Ring first and then select the same setting (or a different one if you like to experiment) again for the left one. Furthermore, this applies to all three light settings.
If you decided to configure the Corona Rings of your BMW F20 you can choose between the following brightness levels for daytime running light, parking light and parking light:
- Very low
- Low
- Rather low
- Medium
- Rather bright
- Bright
- Very bright
All of the mentioned options can be coded in the Front Electronic Module (FEM).
Parking Aid Coding
Coding the parking aid of your BMW F20 comes with a whole range of cool configurations.
For example, you can activate the parking aid to turn on automatically when you roll backwards. You can easily activate this function via the Rear Electronics Module (REM). Additionally, both the distance limit and the speed limit can be coded. Moreover, when reaching the set distance limit or the set speed limit, the parking aid is automatically switched off. However, this only applies if the vehicle is in forward gear.
You can choose your preferred distance limit from the following options:
- 1 m
- 10 m
- 25 m
- 50 m
- 75 m
- 100 m
- 150 m
- 200 m
- 250 m
And the speed limit has the following choices:
- 1 km/h
- 15 km/h
- 36 km/h
Similar to the parking aid, the distance and speed limit is also available for the rear view camera. From the selected distance limit or speed limit (when also both in forward gear) the rear view camera is switched off.
You can also choose different distances between 1m and 250m. For the speed limit the options 1 km/h, 15 km/h, and 36 km/h are available.
Both the configuration of the parking aid and the coding of the rear view camera can be done with the Rear Electronics Module (REM).
Another coding option is the Park Distance Control display. Here you can choose between the horizontal and vertical view and carry out the coding in the Car Information Computer (CIC).
Coding the warning sound on your BMW F20
Finally there are some options to configure the warning sound. There is a distinction between the warning tone in the front and the warning tone in the back. Both warning tones can be easily coded in the Park Distance Control (PDC) module and offer the following coding options:
- Very faint
- Weak
- Medium
- Strong
- Very strong
Driving Assistant Coding
Coding your driving assistant can not only make driving easier, but it also can make driving your F20 safer.
The first thing you can do is code the driving assistant to allow you to adjust the blind spot detection. The speed at which the blind spot detection is activated can be set to one of the following:
- 10 km/h
- 20 km/h
- 30 km/h
- 50 km/h
It should be noted, however, that blind spot detection must be installed in the vehicle as standard. Otherwise the coding can be performed, but it has no effect Coding can be performed in the Integrated Chassis Management module (ICM).
Another possibility offered is adjusting the lane assistance. There are two additional options, grass and curb detection, which can be easily added to the already installed lane assistant. The options can be used individually or in combination. If you don’t need the additional assistance, you can also switch it off completely. This function can be coded via the front camera (KaFAS).
Coding BMW F20 Home Lights
If you have ever been annoyed about having to stumble up the driveway in the dark, this coding option will certainly help you. Here you have the possibility to extend the display of the Home Lights. If the function is activated, you can prolong the display of the Home Lights by pressing the headlight flasher again. You can easily code this in the Front Electronic Module (FEM).
Code BMW F20 iDrive Start Logo
Now it becomes more technical. If you would like to configure your iDrive start logo on your BMW F20, here is how you do so. With the Carly app you can choose between ten different logos that appear when the iDrive system is started.
These are the available options for coding on your BMW F20:
- BMW Connected Drive version 1, version 2, and version 3
- BMW i
- M Performance
- BMW white
- BMW brown
- Mini
- Rolls Royce
- BMW Christmas
You can also decide how the start of your iDrive system should be animated. You can either animate the previously selected logo, or just show it without animation. In this function there is also the possibility to set the screen completely black. Both the start logo and the animation can be easily coded in the NBT navigation system.
Navigation System Coding
Gas stations suggestions

The integrated navigation also offers a variety of coding options and can be easily coded in the Car Information Computer (CIC) or in the NBT navigation system. Among the many options is the fuel stop suggestion. If this is activated, the navigation system automatically makes suggestions for gas stations along your route.
In addition, the route info can be activated. If it is active, it can be called up under the menu item “Route Info” and shows a step-by-step view of the current route.
Orientation
A particularly helpful option that can be coded in the navigation system is navigation use during an update. This means that you no longer have to worry about losing your orientation during a navigation update.
Arrow view
Furthermore, you can code the arrow view. Instead of being able to access it only in the split-screen, the navigation also brings the possibility to access the arrow view directly in the main window. Just like the previously mentioned possibilities, the arrow view can be coded in the Car Information Computer (CIC). In addition, the navigation has a range map that can be accessed in the main window after activation.
Route magnet
Another interesting feature is the route magnet. This can be used as a possibility to recalculate an active route and can be coded in the NBT navigation system just like the range map. You can also choose to display the current position and the activation of geo-coordinates, which shows the longitude and latitude of the current location. Both options can be coded in the Car Information Computer (CIC).
There is also the possibility to activate the route preview. This has an additional function that can be coded together with the standard route preview. Both the standard route function and the additional option can be coded in the NBT navigation system.
As you can see, the navigation offers many options. Therefore it is best to decide for yourself what is most suited for your driving style and which functions you prefer to do without.
Seat Coding
To make driving your BMW F20 a little bit more comfortable, you can choose between some neat driver and passenger seat settings.
First of all, you can activate the seat heating memory. This function automatically saves the set level of the seat heating. When the seat heating is switched on again, or when the vehicle is switched on again, the preset seat heating level is selected directly. This is super handy if you want to use the seat heating several times on long journeys in winter, or if you have a favorite temperature that you would like to preset.
This option can be easily coded in the Driver Seat Module (SM-FA) and has four choices:
- 15 minutes
- 24 hours
- Permanently
You can also code the entry and exit aid, which makes it easier to get out of the vehicle by extending the lumbar width adjustment of the seat. This function is available for both the driver’s seat and the passenger seat. If you do not need the entering and exit assistance, you can also simply deactivate it. The coding can also be carried out in the driver seat module (SM-FA).
Another small way to code the seat is to get confirmation of the seat setting memory. To let you know when your seat setting was successfully saved by your BMW F20, you can easily code a confirmation tone with the Carly app. If the function is activated, you will hear a short chime after successfully saving the seat setting using the memory buttons. Similar to the above mentioned coding options, the audio confirmation is also coded via the Driver Seat Module (SM-FA).
Parking Light Coding
Next we will look at the coding of the parking light. Similar to the daytime running light, this can be coded very specifically for each individual headlamp.
Here you can choose between seven different brightness levels for the Corona Rings (Angel Eyes) on the front right and front left:
- Very low
- Low
- Rather low
- Medium
- Rather bright
- Bright
- Very bright
In addition, there is also the option of coding the fog lights as parking lights. If this option is activated, the fog lights can be switched on even if the light switch is set to the parking light position.
Another feature you can code is the parking light. If this function is activated, you can simply turn on the parking light with the turn signal. To do this, you first switch off the ignition, turn on the turn signal and lock the car. All parking light functions can be easily coded in the Front Electronic Module (FEM).
Speedometer Coding

If you’ve been staring at the same speedometer long enough and you want to spice it up a bit, this section is for you. You can easily change the design of your speedometer in the COMBI module of your BMW. Here you can choose between the traditional speed display and the speed display in the digital display below the speedometer. The traditional speed display is the default option, and the digital display must be activated first in order to change it.
You also have the possibility to modify the measurement of the speed. By default all speedometers correct the speed upwards, so that there are always a few km/h more displayed. If this correction bothers you, you have the possibility to change the measurement to the actual speed. This option can also be coded in the COMBI module and affects both the analog and digital speed display.
Coding BMW F20 Daytime Running Lights
Another coding option that you have for your BMW F20 is the coding of the daytime running light. With the Carly app, you can code each headlight individually and you have the choice between many settings.
First you can adjust the position of the light switch and choose in which position the daytime running light function is activated. These are the possible positions:
- A or 0
- A, 0, or 1
- Dipped beam
- High beam
The switch position is always the same for all headlights and can be coded in the Front Electronic Module (FEM).
After you have coded the switch position, you can now code each headlight of your BMW F20 and choose between many stylish options.
Headlights brightness
The brightness of the Corona Rings (Angel Eyes) can be coded for both front left and front right and has the following brightness levels for both headlights:
- Very low
- Low
- Rather low
- Medium
- Rather bright
- Bright
- Very bright
The coding of your Corona Rings, as well as the switch position, can be done in the Front Electronic Module (FEM).
Rear lights brightness
The rear lights also have a daytime running light option and can be coded with different brightness levels. Since these do not necessarily have to be switched on in the daytime running light setting, they initially have the option of activation or deactivation. If you decide to activate the reversing lights of your BMW F20, you can choose between these brightness levels:
- Very low
- Low
- Medium
- Bright
- Very bright
In addition, you can code the taillights outside left and right as well as the taillights inside left and right separately and even activate or deactivate them independently. You can do this with the Rear Electronics Module (FEM).
Last but not least, there is an alternative coding possibility for the daytime running light mode. If you have problems with the individual coding of the headlights, you can permanently switch the daytime running light mode on or off in the Car Information Computer (CIC). To do this, the option “Show menu item” must first be activated. This will display another menu item in the iDrive, which you can use to select the desired daytime running light mode.
Coding the Welcome Light
An absolute eye-catcher with every BMW F20 and a coding must is the Welcome Light, i.e. the ones that light up when the BMW F20 is unlocked. Here, your BMW comes with a whole range of coding options, all of which can be coded either in the Front Electronic Module (FEM) or the Rear Electronics Module (REM).
Before you can start coding the many settings of the Welcome Light, you first have to decide whether you want to activate your Welcome Light at all.
If you have decided on the Welcome Light, you can activate it in the Front Electronic Module (FEM). It may be necessary to activate the function in the iDrive as well. In addition, the light switch of your BMW F20 must be set to “Auto” so that the Welcome Light is automatically switched on the next time you unlock it.
If you want to change the position of the light switch that activates the Welcome Light, you can choose between the following options:
- Off
- Automatic
- Automatic or 2
This function is also coded in the Front Electronic Module (FEM).
Now you can finally start to code your Welcome Light as you like. But we recommend you to select the brightness level and the duration of the Welcome Light first, because these options are used for all lights.
External lights – Brightness level
You can code any of the following brightness levels of the external lights of your BMW F20:
- Very low
- Low
- Medium
- Bright
- Very bright
Welcome lights duration
And you have the following choices when coding the Welcome Light duration:
- 10 seconds
- 20 seconds
- 40 seconds
- 90 seconds
- 150 seconds
- 240 seconds
This selection is automatically applied to all selected lights of the Welcome Light.
Welcome front lights
In the front area of your car you can code the following lights as Welcome Lights:
- Front left and right parking light
- Daytime running light left and right
- Left and right dipped beam light
- Front left and right turn signals
- Blinker center (mirror), left, and right
- Design lamp left and right
- High beam left and right
- Fog lights left and right
As you can see, you have many cool options that you can code as Welcome Light. But you don’t have to activate all the lights mentioned. For each option you can choose between a soft switch on or a hard switch on. All listed lights can be easily coded in the Front Electronic Module (FEM).
Interior lighting
Furthermore, there are two coding options for the interior lighting of your BMW F20. First, the interior lighting can be coded as Welcome Light. You can choose between seven different brightness levels, or you can simply switch the option off completely:
- Very low
- Low
- Rather low
- Medium
- Rather bright
- Bright
- Very bright
Another cool option is turning on the interior lights when the car is unlocked. Just like the Welcome Light setting, you can choose between seven brightness levels. If you don’t want to use this option, you can turn it off completely. Both options of the interior lighting can be set in the Front Electronic Module (FEM).
Your BMW F20 also has the option to activate the Welcome Light only in the dark. If this function is activated, the Welcome Lights will only be switched on when the Rain-Light Sensor (RLS) detects that it is dark. However, you can only use this function if your vehicle has a rain-light sensor installed. This option is also coded by the Front Electronic Module (FEM).
Welcome rear lights
Of course there are also a lot of coding options for the rear lights of your BMW F20. Here you can code the following lights as Welcome Light:
- Rear left and right turn signals
- Rear parking light left and right outside
- Left and right reversing light
- Rear sidelights left and right inside
- Rear fog light left and right
- Brake light left and right
- Third brake light
- License plate illumination
Of course you can decide again whether these lights should be activated and whether you prefer hard or soft switching on.
All configurations of your rear lights can be easily coded using the Rear Electronics Module (REM).
We hope this article has given you a good overview of the many customization possibilities available on your BMW F20!
Like having your own mechanic!